sheepherder
New Member
- Messages
- 38
- Location
- NewEngland US
I'm posting this thread because i think some of you might find it (TIT "tub in tub" incubator) as useful as i have over the years.
I initially learned how to make one of these on a Mycology forum, and i would never bother w/ any other diy incubator.
Good reasons to try a TIT..
1) inexpensive to make
2) very little temp fluctuation (once dialed in)
3) way roomier than your typical store bought incubator
4)EVEN internal temp of every inch of use-able space.
5)good humidity level
6)use-able for "anything" that needs incubating.
The concept is simple yet very effective.
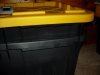
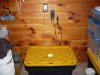
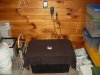
top tub sits inside bottom tub that is filled with heated water. Top tub becomes your incubation chamber.
supplies list
1) (2) rubbermaid, sterillite, etc.. storage bins of the same make and size.
2) medium quality aquarium heater (the kind that has adjustable temp control on top)
3) something to use as spacers between tubs. ie. a couple bricks, 4 small coffee mugs etc..
4)plastic zip tie's ( 10in. or so)
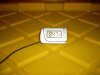
5)digital thermometer w/ probe (the 6-10 dollar type)
optional supplies... to make things easier.
1) digital thermometer w/ water-proof probe (typically used for aquariums and very inexpensive)
2)temp controller of your choosing (hydrofarm, activeaqua reservoir controller, etc.)
3)lg towel or sm blanket (for winter if your ambient temps are too cold)
Step 1.
Place tub in desired location and put your spacers in tub.
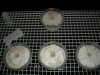
You could just use a couple of clean bricks, one on each side, but i find it works better if you have something in all 4 corners. I use 4 small coffee mugs, all the same kind and size to keep things level.
All these are for is to create a 3 or 4in. space between the floor of the tubs. This keeps the weight of whatever goes in the top tub, from crushing/sitting on aquarium heater.
This would be a good time to mention this.
If you can, try and buy one of the heaters that have a hard plastic or metal shell. In my experience (iv'e tried them all) they work much better than the glass ones do.
Step 2.
place heater in the bottom of the tub. if your not going to use the temp controller, manually set the temp on the heater for 3 or 4 degrees higher than your target temp your incubating at. This is to compensate for the heat having to go through the plastic floor of the top tub. If your going to use the controller its not a problem because you can set it externally afterwards. It's not necessary, but use the suction cup and harness it comes with and stick it to the floor of the tub. It may come off over time but that is no problem. it just keeps it stationary, where you put it.
I place mine on either end and run up the closest inside corner with the cord.
Step 3.
Put the second tub into the tub w/ heater and spacers.
Step 4.
Now your going to want to zip-tie the 4 corners together until there snug.
If you can, try to find the storage containers that already have holes in the rim on all 4 corners and the center of both sides.
That way you don't have to drill your own holes in the rims of the tubs.
Zip-tie the middle of both sides of the tubs as well until snug. Try and tighten them down evenly.
The reason you have to zip-tie the top tub down now, is because if not, as soon as you fill the lower tub with water it will push the top tub up from the water pressure. It would be very difficult to zip-tie after its filled with water. Trust me i learned the hard way. lol
see pic below.
I initially learned how to make one of these on a Mycology forum, and i would never bother w/ any other diy incubator.
Good reasons to try a TIT..
1) inexpensive to make
2) very little temp fluctuation (once dialed in)
3) way roomier than your typical store bought incubator
4)EVEN internal temp of every inch of use-able space.
5)good humidity level
6)use-able for "anything" that needs incubating.
The concept is simple yet very effective.
top tub sits inside bottom tub that is filled with heated water. Top tub becomes your incubation chamber.
supplies list
1) (2) rubbermaid, sterillite, etc.. storage bins of the same make and size.
2) medium quality aquarium heater (the kind that has adjustable temp control on top)
3) something to use as spacers between tubs. ie. a couple bricks, 4 small coffee mugs etc..
4)plastic zip tie's ( 10in. or so)
5)digital thermometer w/ probe (the 6-10 dollar type)
optional supplies... to make things easier.
1) digital thermometer w/ water-proof probe (typically used for aquariums and very inexpensive)
2)temp controller of your choosing (hydrofarm, activeaqua reservoir controller, etc.)
3)lg towel or sm blanket (for winter if your ambient temps are too cold)
Step 1.
Place tub in desired location and put your spacers in tub.
You could just use a couple of clean bricks, one on each side, but i find it works better if you have something in all 4 corners. I use 4 small coffee mugs, all the same kind and size to keep things level.
All these are for is to create a 3 or 4in. space between the floor of the tubs. This keeps the weight of whatever goes in the top tub, from crushing/sitting on aquarium heater.
This would be a good time to mention this.
If you can, try and buy one of the heaters that have a hard plastic or metal shell. In my experience (iv'e tried them all) they work much better than the glass ones do.
Step 2.
place heater in the bottom of the tub. if your not going to use the temp controller, manually set the temp on the heater for 3 or 4 degrees higher than your target temp your incubating at. This is to compensate for the heat having to go through the plastic floor of the top tub. If your going to use the controller its not a problem because you can set it externally afterwards. It's not necessary, but use the suction cup and harness it comes with and stick it to the floor of the tub. It may come off over time but that is no problem. it just keeps it stationary, where you put it.
I place mine on either end and run up the closest inside corner with the cord.
Step 3.
Put the second tub into the tub w/ heater and spacers.
Step 4.
Now your going to want to zip-tie the 4 corners together until there snug.
If you can, try to find the storage containers that already have holes in the rim on all 4 corners and the center of both sides.
That way you don't have to drill your own holes in the rims of the tubs.
Zip-tie the middle of both sides of the tubs as well until snug. Try and tighten them down evenly.
The reason you have to zip-tie the top tub down now, is because if not, as soon as you fill the lower tub with water it will push the top tub up from the water pressure. It would be very difficult to zip-tie after its filled with water. Trust me i learned the hard way. lol
see pic below.


")
